Windows 8 is the next generation of Microsoft Windows operating systems. Many of its features are essentially the same as Windows 7, but designed to be more mobile friendly and streamlined.
Use of the start screen:
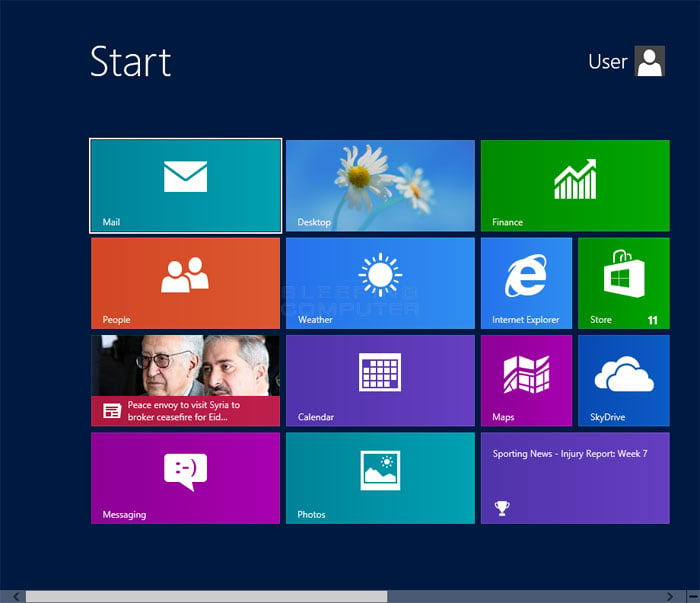
Use the tiles. When you start the computer, after passing the lock and sign-in screens, it will take you to the start screen. This screen replaces the function of the start button in previous versions of Windows. On your start screen, you will see several boxes in various sizes and colors. These are tiles. Tiles act the same as icons did in previous versions, in that clicking on them starts the program that they represent.
Some tiles will present basic information associated with that program. For example, the Store tile will show the number of programs, which have available updates (if any).
You can move the tiles by holding and dragging them. With the Windows 8.1 update, you can even batch move (as well as edit) tiles.
Take advantage of the live tiles. Live tiles are tiles, which change every few seconds to present you with various information. These can be helpful and give your start screen a more dynamic look but they are not available for every application. Using live tiles is especially helpful with things like News applications, which will flash headlines to keep you updated.

Click the Desktop tile to switch to the desktop view. There should be a tile on your start screen, which takes you to the traditional desktop view. You do not need to use Desktop view to do most tasks, but you may wish to default to desktop view until you become more comfortable with Windows 8.
Using the Desktop View:

Use the new Start button. Once you are in desktop view, you may notice the traditional start button is a little different. While the button was missing in the original Windows 8, it was replaced with 8.1. However, the menu that it brings up is the metro or modern start menu and does not resemble the original. Selecting the start button from the charms menu will also bring up the start menu.
Just think of the start screen as a start menu that is big and more powerful.
If you are uncomfortable with the switch between the desktop and the start screen, with Windows 8.1 you are able to set the start screen to overlay the desktop, giving it a Windows 7 sort of quality.
Organize and use your files as in previous versions. While using desktop view, you will notice that everything is the same. You can still organize your files in folders, start programs, and open and create files in the same ways as previous versions of Windows.
Use the desktop as a single application. You will need to understand that Windows 8 treats the desktop view as a single application. This will be important when viewing the taskbar and switching between programs.

Set the computer to boot to the desktop. If you want to, you can change the settings to allow you to boot directly to the desktop, as of Windows 8.1. This option can be found under the Navigation tab, found in the accessed-as-normal taskbar Properties menu.
Using Basic Navigation:
Use the Charms bar. Access the charms menu by holding your mouse in the upper right corner and dragging directly down. This will bring up your system time, as well as a menu, which is used to control several function of the computer. It is a powerful and important menu and you will want to know it.
Search is very similar to the All Applications button on the original start menu. However, for some apps pressing the search charm will search within that program, rather than searching the computer. Pay attention to this.
Share is used when doing tasks like viewing pictures. Share items to attach them to emails, place them in your OneDrive, or a number of other functions depending on the file.
Start returns you to the start menu.
Devices allows you to access things like a second screen, or to set up and use printers. What is available will depend on what you have and what program you are using.
Settings can access the current application settings in some cases, but will otherwise access the computer’s settings. This is how you turn the computer off or put it to sleep, connect to the internet, manage the sound, personalize the computer, and access the control panel, among other functions.
Switch between windows. Switch between windows, programs, or apps by holding your mouse in the top left-hand corner of the screen and clicking the left mouse button. This will cycle through the currently running programs. To navigate to a specific program quickly, hold your mouse in that corner and drag directly down to access the equivalent of the taskbar, which will show all open programs.
Remember that the desktop is treated as a single application, so you may need to open the desktop before being able to go directly to the program you wish to access.
Open programs. Open programs and applications by clicking tiles on the start screen or program icons in desktop view. You may wish to create tiles for programs, which you use often, which are discussed below. Programs can be pinned to the desktop taskbar similarly to previous versions.
To pin a program to the taskbar for which you cannot easily find the application icon in desktop view, find the program using the search charm and select “Pin to taskbar”. This is not available for all programs. Pinning to the start menu, however, should always be available.
Close programs. Close programs using the familiar "x" button at the top right corner of program windows. If this is not available, you can open the side taskbar by holding your mouse in the upper left corner and dragging down, then right clicking on the program you wish to close.
You can also press ⎇ Alt+F4 to close a program, though this will only close the program you are viewing.
Use multiple programs simultaneously. You may eventually find that when you navigate away from, say, your internet window where a song is playing on YouTube, the music will stop. If you want to use two programs in Windows 8 at once, you will need to put the computer into the windowed mode.
Do this by having both programs open at once. Hold your mouse in the top left corner and the other program you wish to view should appear. Grab the image and then hold it at the edge of the screen until the side pops out. Let go and both programs will be open and running.
Windows 8.1 allows for having up to 8 apps running at once, but this number is determined by your screen size. Tablets, for example, can still only have two.
Using the Basic Programs:
Use the Office Suite. If you have the newest version of the Office Suite which was designed to pair with Windows 8, you may notice that it has a much more sleek interface. The functionality is largely the same, however, to Office 7, so if you are acquainted with that version you should have an easy time switching over. Certain new features have been added to the various programs to improve functionality and you will likely find your Office experience much more productive and simpler to use.
Use the Mail application. This is a useful application, which handles all of your email accounts by streaming them together into a single program. Sync the program with Hotmail, Yahoo, AOL, Gmail or Google, Outlook, and many other email services. You will be able to view, send, and organize all of your mail from this single program.
Add email accounts by clicking settings from the charms menu and then clicking Accounts and Add accounts.

Use OneDrive. OneDrive is an application which allows you to store files on the internet, so they can be accessed from anywhere. You can keep these files private, make them public, or share them with particular individuals. You can create folders, upload files, as well as do things like refresh the screen and view details by right clicking in the background of the window.
Use of Microsoft OneDrive usually requires a subscription but some features may be available for free.
Use the Store. The Windows Store is a helpful service that allows you to find and download new programs to use on your device. Some are free, while others will cost money. You can download games, productivity, social and entertainment, sports, reading applications, as well as various other programs.
Access the Accessories. You may wish to access some of the programs previously contained in the accessories menu, such as Notepad or the Calculator. These programs and utilities are still included in Windows 8 and can be found by clicking the search button on the charms menu and generally scrolling all the way to the right.
These programs will generally run in Desktop view and are treated as a single entity.
Use the new printing tools. You will need to make sure you have set up a printer through the devices charm. For programs that run on desktop or have familiar interfaces, you can print in the same way you are used to printing. However, for apps with the “modern look” of the Windows 8 interface, you will need to find the print button within that program or you can use the hotkey ^ Ctrl+P to open the print dialogue.
Setting up custom tiles. You can create new tiles on the start menu by right-clicking the application icon in the search menu. You can also change how tiles look in the same way, by selecting the size (when available). Completely custom tiles can be created using third-party programs, which will allow you to set the image and text of a tile.
Changing Programs, Settings, and Appearance:
Add programs. You can install programs using disks, as before, or you can install programs using the Store, as discussed above. Programs can also be downloaded and installed from the internet, as in previous versions of Windows. There are varieties of programs available, but it is important to remember that not all programs will work (or work correctly) in Windows 8.
Check new software you buy or download to ensure that it runs with Windows 8. You can also use the Upgrade Assistant if you have not switched over yet or you can use Microsoft’s compatibility checker to find out how your programs will run.
You can also run programs in compatibility mode or try downloading the latest drivers, to help them run better.
Uninstall programs. You can uninstall some programs by right-clicking their tile or program icon in the search menu. You can also use the familiar Add or Remove Programs tool. The easiest way to access this is to open the search charm and type Add or Remove Programs into the search bar. The program will be under the Settings, which will need to be selected on the right if you're on Windows 8.
Understand that uninstalling a program is different that simply making the tile go away. If you would rather remove the tile, read the step below.

Remove tiles. Remove tiles by right-clicking on them and selecting “Unpin from Start”. This is different from uninstalling, as the program will still be installed and accessible, it just won’t be on the start screen.
Adjust the basic six settings. There are six basic settings accessible from the charms menu. These are Network options, System Volume, Screen Brightness, Notifications, Power, and Keyboard settings. These are largely self explanatory and will allow you basic control of your system.
Access the more advanced settings. Change some of the more advanced settings by selecting “Change PC Settings” just below the main six settings. Here you can personalize your screen, change user settings, privacy and sync settings, as well as various other settings.
The desktop view can be used in the familiar way to change some settings.
Access the Control Panel. The control panel can still be accessed, most easily by searching using the search charm or by clicking Control Panel under the Settings charm. You can also access the Control Panel and several other settings by placing your mouse in the lower left corner and right-clicking.
Personalize the appearance of your device. There are several different ways you can change the appearance of your device. This is a great way to give your device a personal feel. These settings can also be synced across devices, if you wish, which will make sure you always see the same screen, no matter what device you use.
Personalize the start screen. Personalize the start screen background and color scheme by selecting "Settings" from the charms menu and then Personalize. This is only available from the start screen. The option exists, in this menu, to make the start screen an overlay of the desktop, instead of of a vastly different looking screen. This also means that you can, in a way, set a custom image as your start screen background.
Personalize the desktop. Right-click the background of the desktop view and select “Personalize”. Set the background image to whatever picture file you have access to or chosen from a preset image.
Personalize the lock screen. Personalize the lock screen background by selecting “Change PC Settings” from just below the main six settings. From there, click on “Personalize” and “Lock Screen”. It is possible to get custom background images by clicking “Browse”.
Change your account pictures. Personalize your account picture by selecting “Change PC Settings” from just below the main six settings. From there, click on “Personalize” and “Account Picture”. You can upload an existing picture or take a new one if you have a webcam.
Use extended mode. You can enable the use of a second screen (if you have one) easily by selecting “Devices” from the charms menu. Click Second Screen and follow the prompts to decide the settings.
To change how the taskbar works with two screens, you will need to right click the taskbar in desktop view and choose “Properties”.
Gaining Better Control:
Set up other users. Add new users for the device by selecting “Change PC Settings” from just below the main six settings, in the Settings section of the charms menu. From there, click on “Users” and “Add a user”.
Create shutdown and reboot tiles. You can create tiles to shut down or reboot the computer if you would find that to be easier. Start in desktop view, right-click and choose “New” and then “Shortcut”, type shutdown /p into the location field, and then click next. When that’s done, right click the new shortcut and choose “Pin to Start”. You can similarly create a reboot tile by typing in shutdown /r /t 0 instead of shutdown /p.
Use the task manager. You can access the task manager, which has been given a badly-needed overhaul, by right-clicking in the bottom left corner of the screen, by navigating all the way to the right in the search menu, by right-clicking in the taskbar, or by pressing ^ Ctrl+⎇ Alt+⌦ Del or ^ Ctrl+⇧ Shift+⎋ Esc.
Use parental controls. Parental controls exist in Windows 8 and are easier to use than ever, however, they’ve been renamed to Family Safety. You can get activity reports (sent straight to your email!), set up filters and restrict apps, and create time limits, among other features.
Family Safety will need to be turned on when creating the user account.
Open the control panel, select “User Accounts and Family Safety”, “Family Safety”, and then choose the user for whom you would like to change the safety settings.
Sync between devices. You can sync settings between all your Windows 8 devices by simply attaching the device to your Microsoft account, and allowing syncing in your settings. Change the setting by selecting “Change PC Settings” from just below the main six settings, in the Settings section of the charms menu. From there, click on “Sync Your Settings” and turn it on.
Learn the hotkeys. Hotkeys are key combinations that, when pressed together, cause certain effects. These can open and close programs or windows, as well as several other functions. Some hotkeys are the same as previous versions of Windows and some new hotkeys have been added. There are many hotkeys, but here are a few useful ones:[10]
⊞ Win or the Windows button will bring you to the start menu.
⊞ Win+typing will allow you to start searching for applications, programs, and files.
⎋ Esc will cancel many actions.
⊞ Win+X will allow access to many user commands.
⊞ Win+L will allow you to lock the screen on your account, so no one else is able to use the account. If there is a password set up for the account, a password will be needed to unlock the account.
⊞ Win+C will open the charms menu.
⎇ Alt+Tab ↹ will switch between applications.
⊞ Win+E opens the program File Explorer.
Setting up Security:

Understand the included security features. The included virus and malware protection service, Windows Defender, is a strong, capable program which should serve well to protect your computer. However, if your computer came pre-installed with a third-party service, Defender may be turned off. Open it using the search menu to ensure that everything is operational.
Set up a picture password. You can set up a picture password, which combines an image with a hand or mouse gesture, to allow you to log-in, rather than using a typed password. It is maybe not the best idea for touch devices, as grease marks may make it possible to guess the picture password, but this is up to you.
In your user settings, click “Sign in options” and “Create a picture password”.
Use BitLocker. BitLocker is an inherent encryption tool within Windows 8, used to make your drive more secure. Set it up by going to the Control Panel, then System and Security, then BitLocker Drive Encryption.
Make sure to store your recovery key in a safe place, as losing it would possibly mean the loss of your data.
Understand the security risks of syncing devices. While it is useful, syncing devices poses a large security risk. If someone gains access to your credentials, they can access your files from any Windows 8 device. Weigh the pros and cons and decide what is right for you.
Use of the start screen:
Use the tiles. When you start the computer, after passing the lock and sign-in screens, it will take you to the start screen. This screen replaces the function of the start button in previous versions of Windows. On your start screen, you will see several boxes in various sizes and colors. These are tiles. Tiles act the same as icons did in previous versions, in that clicking on them starts the program that they represent.
Some tiles will present basic information associated with that program. For example, the Store tile will show the number of programs, which have available updates (if any).
You can move the tiles by holding and dragging them. With the Windows 8.1 update, you can even batch move (as well as edit) tiles.
Take advantage of the live tiles. Live tiles are tiles, which change every few seconds to present you with various information. These can be helpful and give your start screen a more dynamic look but they are not available for every application. Using live tiles is especially helpful with things like News applications, which will flash headlines to keep you updated.
Click the Desktop tile to switch to the desktop view. There should be a tile on your start screen, which takes you to the traditional desktop view. You do not need to use Desktop view to do most tasks, but you may wish to default to desktop view until you become more comfortable with Windows 8.
Using the Desktop View:
Use the new Start button. Once you are in desktop view, you may notice the traditional start button is a little different. While the button was missing in the original Windows 8, it was replaced with 8.1. However, the menu that it brings up is the metro or modern start menu and does not resemble the original. Selecting the start button from the charms menu will also bring up the start menu.
Just think of the start screen as a start menu that is big and more powerful.
If you are uncomfortable with the switch between the desktop and the start screen, with Windows 8.1 you are able to set the start screen to overlay the desktop, giving it a Windows 7 sort of quality.
Organize and use your files as in previous versions. While using desktop view, you will notice that everything is the same. You can still organize your files in folders, start programs, and open and create files in the same ways as previous versions of Windows.
Use the desktop as a single application. You will need to understand that Windows 8 treats the desktop view as a single application. This will be important when viewing the taskbar and switching between programs.
Set the computer to boot to the desktop. If you want to, you can change the settings to allow you to boot directly to the desktop, as of Windows 8.1. This option can be found under the Navigation tab, found in the accessed-as-normal taskbar Properties menu.
Using Basic Navigation:
Use the Charms bar. Access the charms menu by holding your mouse in the upper right corner and dragging directly down. This will bring up your system time, as well as a menu, which is used to control several function of the computer. It is a powerful and important menu and you will want to know it.
Search is very similar to the All Applications button on the original start menu. However, for some apps pressing the search charm will search within that program, rather than searching the computer. Pay attention to this.
Share is used when doing tasks like viewing pictures. Share items to attach them to emails, place them in your OneDrive, or a number of other functions depending on the file.
Start returns you to the start menu.
Devices allows you to access things like a second screen, or to set up and use printers. What is available will depend on what you have and what program you are using.
Settings can access the current application settings in some cases, but will otherwise access the computer’s settings. This is how you turn the computer off or put it to sleep, connect to the internet, manage the sound, personalize the computer, and access the control panel, among other functions.
Switch between windows. Switch between windows, programs, or apps by holding your mouse in the top left-hand corner of the screen and clicking the left mouse button. This will cycle through the currently running programs. To navigate to a specific program quickly, hold your mouse in that corner and drag directly down to access the equivalent of the taskbar, which will show all open programs.
Remember that the desktop is treated as a single application, so you may need to open the desktop before being able to go directly to the program you wish to access.
Open programs. Open programs and applications by clicking tiles on the start screen or program icons in desktop view. You may wish to create tiles for programs, which you use often, which are discussed below. Programs can be pinned to the desktop taskbar similarly to previous versions.
To pin a program to the taskbar for which you cannot easily find the application icon in desktop view, find the program using the search charm and select “Pin to taskbar”. This is not available for all programs. Pinning to the start menu, however, should always be available.
Close programs. Close programs using the familiar "x" button at the top right corner of program windows. If this is not available, you can open the side taskbar by holding your mouse in the upper left corner and dragging down, then right clicking on the program you wish to close.
You can also press ⎇ Alt+F4 to close a program, though this will only close the program you are viewing.
Use multiple programs simultaneously. You may eventually find that when you navigate away from, say, your internet window where a song is playing on YouTube, the music will stop. If you want to use two programs in Windows 8 at once, you will need to put the computer into the windowed mode.
Do this by having both programs open at once. Hold your mouse in the top left corner and the other program you wish to view should appear. Grab the image and then hold it at the edge of the screen until the side pops out. Let go and both programs will be open and running.
Windows 8.1 allows for having up to 8 apps running at once, but this number is determined by your screen size. Tablets, for example, can still only have two.
Using the Basic Programs:
Use the Office Suite. If you have the newest version of the Office Suite which was designed to pair with Windows 8, you may notice that it has a much more sleek interface. The functionality is largely the same, however, to Office 7, so if you are acquainted with that version you should have an easy time switching over. Certain new features have been added to the various programs to improve functionality and you will likely find your Office experience much more productive and simpler to use.
Use the Mail application. This is a useful application, which handles all of your email accounts by streaming them together into a single program. Sync the program with Hotmail, Yahoo, AOL, Gmail or Google, Outlook, and many other email services. You will be able to view, send, and organize all of your mail from this single program.
Add email accounts by clicking settings from the charms menu and then clicking Accounts and Add accounts.
Use OneDrive. OneDrive is an application which allows you to store files on the internet, so they can be accessed from anywhere. You can keep these files private, make them public, or share them with particular individuals. You can create folders, upload files, as well as do things like refresh the screen and view details by right clicking in the background of the window.
Use of Microsoft OneDrive usually requires a subscription but some features may be available for free.
Use the Store. The Windows Store is a helpful service that allows you to find and download new programs to use on your device. Some are free, while others will cost money. You can download games, productivity, social and entertainment, sports, reading applications, as well as various other programs.
Access the Accessories. You may wish to access some of the programs previously contained in the accessories menu, such as Notepad or the Calculator. These programs and utilities are still included in Windows 8 and can be found by clicking the search button on the charms menu and generally scrolling all the way to the right.
These programs will generally run in Desktop view and are treated as a single entity.
Use the new printing tools. You will need to make sure you have set up a printer through the devices charm. For programs that run on desktop or have familiar interfaces, you can print in the same way you are used to printing. However, for apps with the “modern look” of the Windows 8 interface, you will need to find the print button within that program or you can use the hotkey ^ Ctrl+P to open the print dialogue.
Setting up custom tiles. You can create new tiles on the start menu by right-clicking the application icon in the search menu. You can also change how tiles look in the same way, by selecting the size (when available). Completely custom tiles can be created using third-party programs, which will allow you to set the image and text of a tile.
Changing Programs, Settings, and Appearance:
Add programs. You can install programs using disks, as before, or you can install programs using the Store, as discussed above. Programs can also be downloaded and installed from the internet, as in previous versions of Windows. There are varieties of programs available, but it is important to remember that not all programs will work (or work correctly) in Windows 8.
Check new software you buy or download to ensure that it runs with Windows 8. You can also use the Upgrade Assistant if you have not switched over yet or you can use Microsoft’s compatibility checker to find out how your programs will run.
You can also run programs in compatibility mode or try downloading the latest drivers, to help them run better.
Uninstall programs. You can uninstall some programs by right-clicking their tile or program icon in the search menu. You can also use the familiar Add or Remove Programs tool. The easiest way to access this is to open the search charm and type Add or Remove Programs into the search bar. The program will be under the Settings, which will need to be selected on the right if you're on Windows 8.
Understand that uninstalling a program is different that simply making the tile go away. If you would rather remove the tile, read the step below.
Remove tiles. Remove tiles by right-clicking on them and selecting “Unpin from Start”. This is different from uninstalling, as the program will still be installed and accessible, it just won’t be on the start screen.
Adjust the basic six settings. There are six basic settings accessible from the charms menu. These are Network options, System Volume, Screen Brightness, Notifications, Power, and Keyboard settings. These are largely self explanatory and will allow you basic control of your system.
Access the more advanced settings. Change some of the more advanced settings by selecting “Change PC Settings” just below the main six settings. Here you can personalize your screen, change user settings, privacy and sync settings, as well as various other settings.
The desktop view can be used in the familiar way to change some settings.
Access the Control Panel. The control panel can still be accessed, most easily by searching using the search charm or by clicking Control Panel under the Settings charm. You can also access the Control Panel and several other settings by placing your mouse in the lower left corner and right-clicking.
Personalize the appearance of your device. There are several different ways you can change the appearance of your device. This is a great way to give your device a personal feel. These settings can also be synced across devices, if you wish, which will make sure you always see the same screen, no matter what device you use.
Personalize the start screen. Personalize the start screen background and color scheme by selecting "Settings" from the charms menu and then Personalize. This is only available from the start screen. The option exists, in this menu, to make the start screen an overlay of the desktop, instead of of a vastly different looking screen. This also means that you can, in a way, set a custom image as your start screen background.
Personalize the desktop. Right-click the background of the desktop view and select “Personalize”. Set the background image to whatever picture file you have access to or chosen from a preset image.
Personalize the lock screen. Personalize the lock screen background by selecting “Change PC Settings” from just below the main six settings. From there, click on “Personalize” and “Lock Screen”. It is possible to get custom background images by clicking “Browse”.
Change your account pictures. Personalize your account picture by selecting “Change PC Settings” from just below the main six settings. From there, click on “Personalize” and “Account Picture”. You can upload an existing picture or take a new one if you have a webcam.
Use extended mode. You can enable the use of a second screen (if you have one) easily by selecting “Devices” from the charms menu. Click Second Screen and follow the prompts to decide the settings.
To change how the taskbar works with two screens, you will need to right click the taskbar in desktop view and choose “Properties”.
Gaining Better Control:
Set up other users. Add new users for the device by selecting “Change PC Settings” from just below the main six settings, in the Settings section of the charms menu. From there, click on “Users” and “Add a user”.
Create shutdown and reboot tiles. You can create tiles to shut down or reboot the computer if you would find that to be easier. Start in desktop view, right-click and choose “New” and then “Shortcut”, type shutdown /p into the location field, and then click next. When that’s done, right click the new shortcut and choose “Pin to Start”. You can similarly create a reboot tile by typing in shutdown /r /t 0 instead of shutdown /p.
Use the task manager. You can access the task manager, which has been given a badly-needed overhaul, by right-clicking in the bottom left corner of the screen, by navigating all the way to the right in the search menu, by right-clicking in the taskbar, or by pressing ^ Ctrl+⎇ Alt+⌦ Del or ^ Ctrl+⇧ Shift+⎋ Esc.
Use parental controls. Parental controls exist in Windows 8 and are easier to use than ever, however, they’ve been renamed to Family Safety. You can get activity reports (sent straight to your email!), set up filters and restrict apps, and create time limits, among other features.
Family Safety will need to be turned on when creating the user account.
Open the control panel, select “User Accounts and Family Safety”, “Family Safety”, and then choose the user for whom you would like to change the safety settings.
Sync between devices. You can sync settings between all your Windows 8 devices by simply attaching the device to your Microsoft account, and allowing syncing in your settings. Change the setting by selecting “Change PC Settings” from just below the main six settings, in the Settings section of the charms menu. From there, click on “Sync Your Settings” and turn it on.
Learn the hotkeys. Hotkeys are key combinations that, when pressed together, cause certain effects. These can open and close programs or windows, as well as several other functions. Some hotkeys are the same as previous versions of Windows and some new hotkeys have been added. There are many hotkeys, but here are a few useful ones:[10]
⊞ Win or the Windows button will bring you to the start menu.
⊞ Win+typing will allow you to start searching for applications, programs, and files.
⎋ Esc will cancel many actions.
⊞ Win+X will allow access to many user commands.
⊞ Win+L will allow you to lock the screen on your account, so no one else is able to use the account. If there is a password set up for the account, a password will be needed to unlock the account.
⊞ Win+C will open the charms menu.
⎇ Alt+Tab ↹ will switch between applications.
⊞ Win+E opens the program File Explorer.
Setting up Security:
Understand the included security features. The included virus and malware protection service, Windows Defender, is a strong, capable program which should serve well to protect your computer. However, if your computer came pre-installed with a third-party service, Defender may be turned off. Open it using the search menu to ensure that everything is operational.
Set up a picture password. You can set up a picture password, which combines an image with a hand or mouse gesture, to allow you to log-in, rather than using a typed password. It is maybe not the best idea for touch devices, as grease marks may make it possible to guess the picture password, but this is up to you.
In your user settings, click “Sign in options” and “Create a picture password”.
Use BitLocker. BitLocker is an inherent encryption tool within Windows 8, used to make your drive more secure. Set it up by going to the Control Panel, then System and Security, then BitLocker Drive Encryption.
Make sure to store your recovery key in a safe place, as losing it would possibly mean the loss of your data.
Understand the security risks of syncing devices. While it is useful, syncing devices poses a large security risk. If someone gains access to your credentials, they can access your files from any Windows 8 device. Weigh the pros and cons and decide what is right for you.
Be careful with apps. Some apps will ask for security permissions that you would rather not give, or have settings which automatically store more of your data than is perhaps wise. Make sure you pay attention to app permissions and don’t download anything shady. Always download apps directly from the store when you can, as this will be safer than downloading them from third-party sites.
Practice common sense. A new operating system doesn’t mean that you should stop using common sense. If a website seems suspicious or something seems off, avoid it. Don’t open emails from weird people, avoid downloading email attachments from people you don’t trust, and avoid websites with many pop-ups and downloads (like video).
No comments:
Post a Comment